Mailchimp
Mailchimp is a powerful marketing platform dedicated to send newsletters: it allows you to create your own newsletter using numerous free templates or creating a personalized layout and to schedule automatic sending.
To start using MailChimp, creating lists of users and sending newsletters, the creation of an account is required. The registration process is free and takes a few minutes.
Mailchimp - Account
1. First create a MailChimp account
Connect to the MailChimp website and press the Sign Up Free button at the top right, then enter your details in the fields Email, Username and Password (minimum 8 characters and containing at least one number, a special character, a lowercase letter and a capitalized) and click the Get Started button.
2. Within a few moments you will receive an email containing an activation link: click on the Activate Account button to complete the registration so your account will be activated.
3. You will be redirected to the Mailchimp Welcome Page, insert your First Name and Last Name and click on the Continue button.
4. Now you will be redirected to the About Your Business page, insert your Business Name and your website link and click again on the Continue button.
If you don't have a website, you can use a Facebook or Twitter URL.
5. Now you will be redirected to the Add Your Address page, fill the fields with your address informations and click on the Continue button.
6. Next page will ask you if you have already a list of email subscribers, just put the check mark on the right option and click on the Continue button.
7. Next page will ask you if you need to connect Social Media, connect with your Facebook/Twitter profile or just click on the Continue button.
8. Next page will ask you to provide more informations about your business, click on the Ok, let’s Do It button, or skip this step by clicking on the Not right now button.
9. Next page will ask you if you need to upgrade to a paid plan, just click on the Not right now button.
10. Nex page will confirm you that your account is ready, click on the Let’s Go! button.
Then go to Lists in your Mailchimp account.
Create a new list if you need by entering the required information and click on the Stats dropdown menu on the right and select Signup Forms.
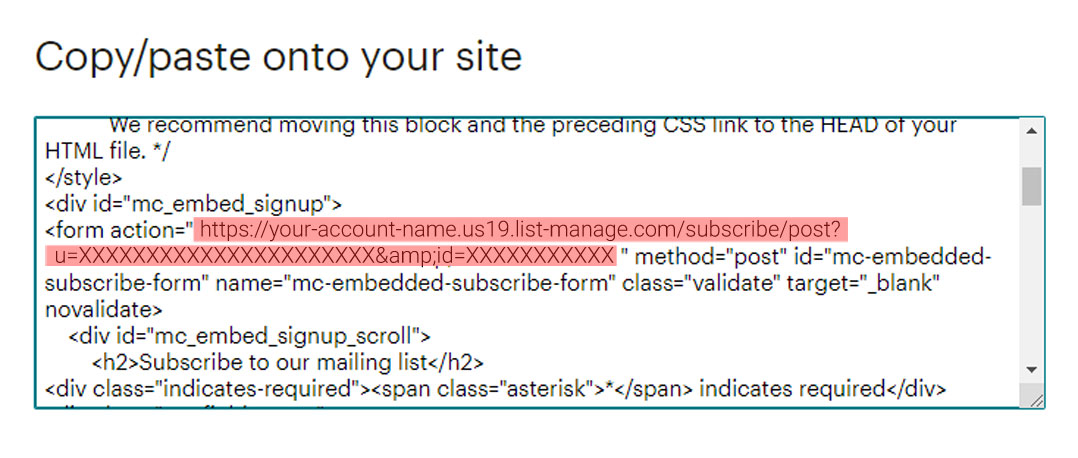
Click on Embed Forms to generate HTML code to embed in your site or blog to collect signups.
In the Embedded forms page, just check the form options you need, Copy/paste the generated code onto your page, and you will have a working Mailchimp form, ready to collect subscribers.
Mailchimp - URL Setup
Now jus have a look at the Embedded forms page code to copy and paste, what we need is the Mailchimp URL generated
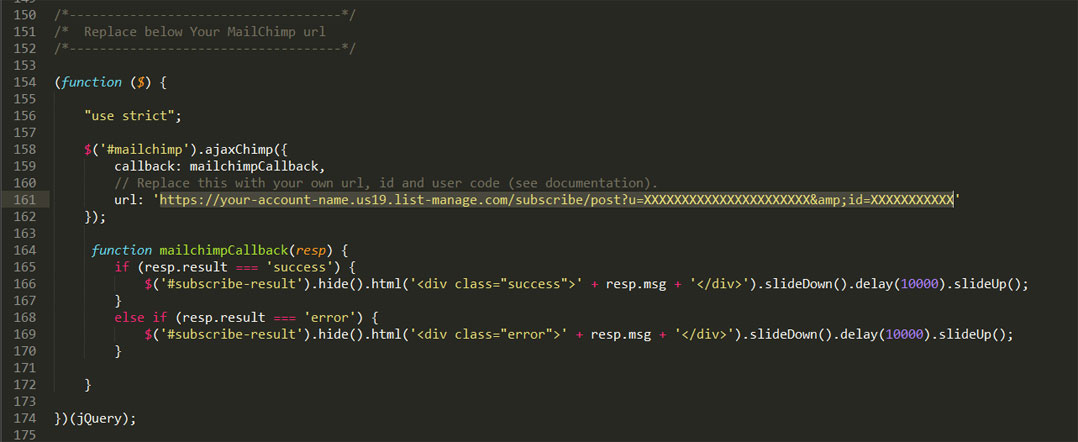
Now you need to replace your MailChimp url in jquery.ajaxchimp.js.

1. Copy the URL code from the Mailchimp embed form
2. Open jquery.ajaxchimp.js (Geniux/assets/js/vendor/jquery.ajaxchimp.js) with your code editor
3. At line 161 replace the demo URL with your working Mailchimp URL.

Now you have a working Newsletter Form connected with Mailchimp.
Mailchimp user guide: https://mailchimp.com/resources/mailchimp-101/